Guide
Your cheat-sheet for successful video consultations
14 tips for professional and practical video consultations.
Introduction
Are you a beginner in video consultations? In the beginning, you may be feeling a bit camera-shy but like hundreds of our users before, there are many tips and tricks to help you overcome this feeling. We have created this cheat-sheet with 14 tips that will make a video consultation feel like second nature to you in a very short time.
Set aside 20 minutes to set up your workstation and start by fully calibrating your mentality: The focus of the video consultation is on the patients rather than yourself – their concerns and condition, the information they share, and the trust they place in you. Keep that in mind while you follow the steps below and your video consultations will be a breeze.
This guide includes:
- Setting up your workstation
- Dos and don’ts of frame composition (eg. light, placement, posture)
- Mapping out the consultation
- What to do before your first video consultation
- A printable cheat-sheet for your work station
Enjoy the read!
Set up your workstation
Preparedness is better than response. Before you start with a video consultation, make sure that you have around you –physically or digitally– everything you need. Access the patient record and assess the next patient’s overall health condition. Also, make sure that your connection is stable at your workstation.
Pro tip: Most of the times, patients provide the condition they booked an appointment for beforehand. Leverage that knowledge and gather the notes and websites that you may need to recite or share.
Remove all distractions
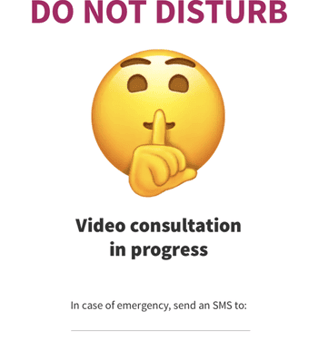
Communicate clearly and effectively that you are having video consultations and that regarding your availability, the same rules as a physical consultation apply. Whether you are on-site or working from home, choose a quiet room, if possible, turn off your mobile phone or put it on silent, let your closest collaborators know and put a note on your door. Don’t have one? We made one for you! (Download the printable version here)
Pro tip: Provide people with alternative asynchronous communication channels to ensure that you will not be disturbed under any circumstances.
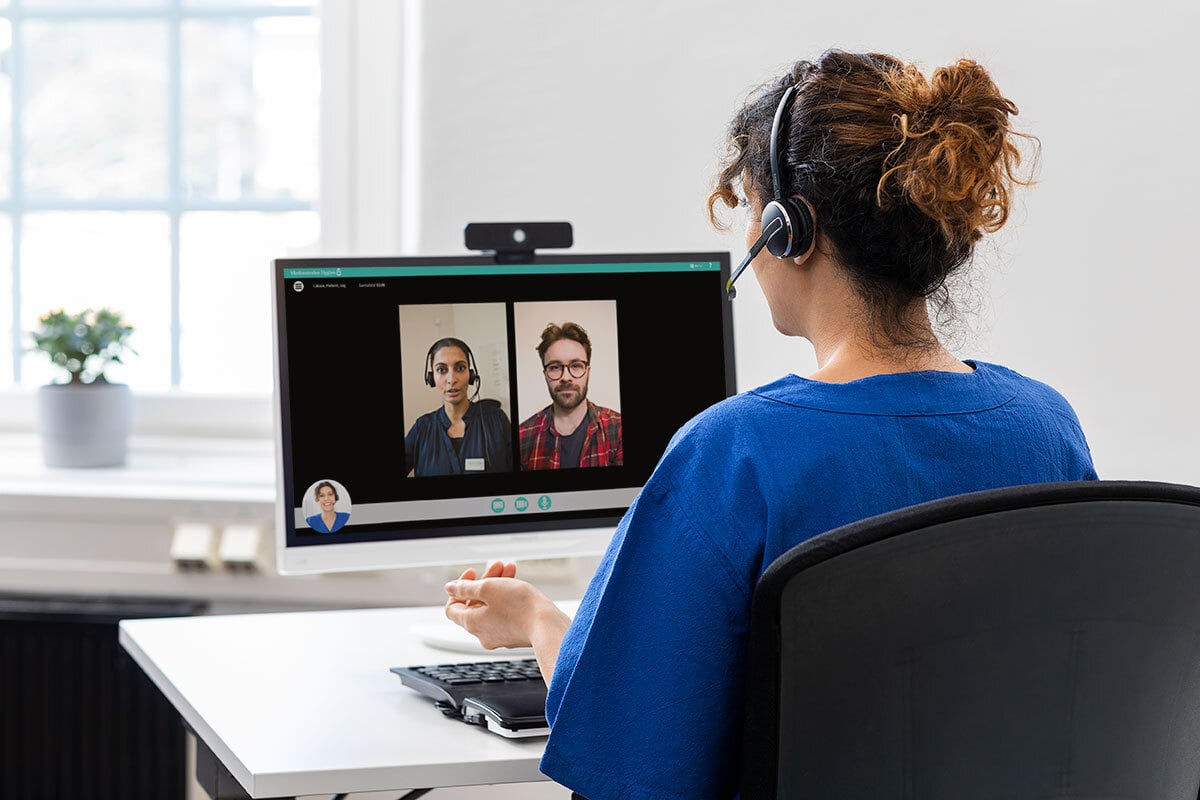
Invest in a headset
A lot of the complications and hindrances in a video consultation come from poor sound quality: Muffled sound, echo, noise. Poor sound quality very often affects your posture and appearance on camera.

Sound disruptions occur frequently and can hinder your conversation.
A headset eliminates these problems and has multiple other benefits. Your hands are free so you can move and take notes. Your sound output is of top quality and provides you with the best conditions to get the best possible sound from your patient. Most importantly, a headset ensures your patients that their integrity and the confidentiality of your consultation is maintained, as the sound is not spilling out from an external speaker.
Pro tip: Getting a wireless headset is an excellent option: you maximise your freedom of movement and you do not have to get the wire out of the way when you are typing.
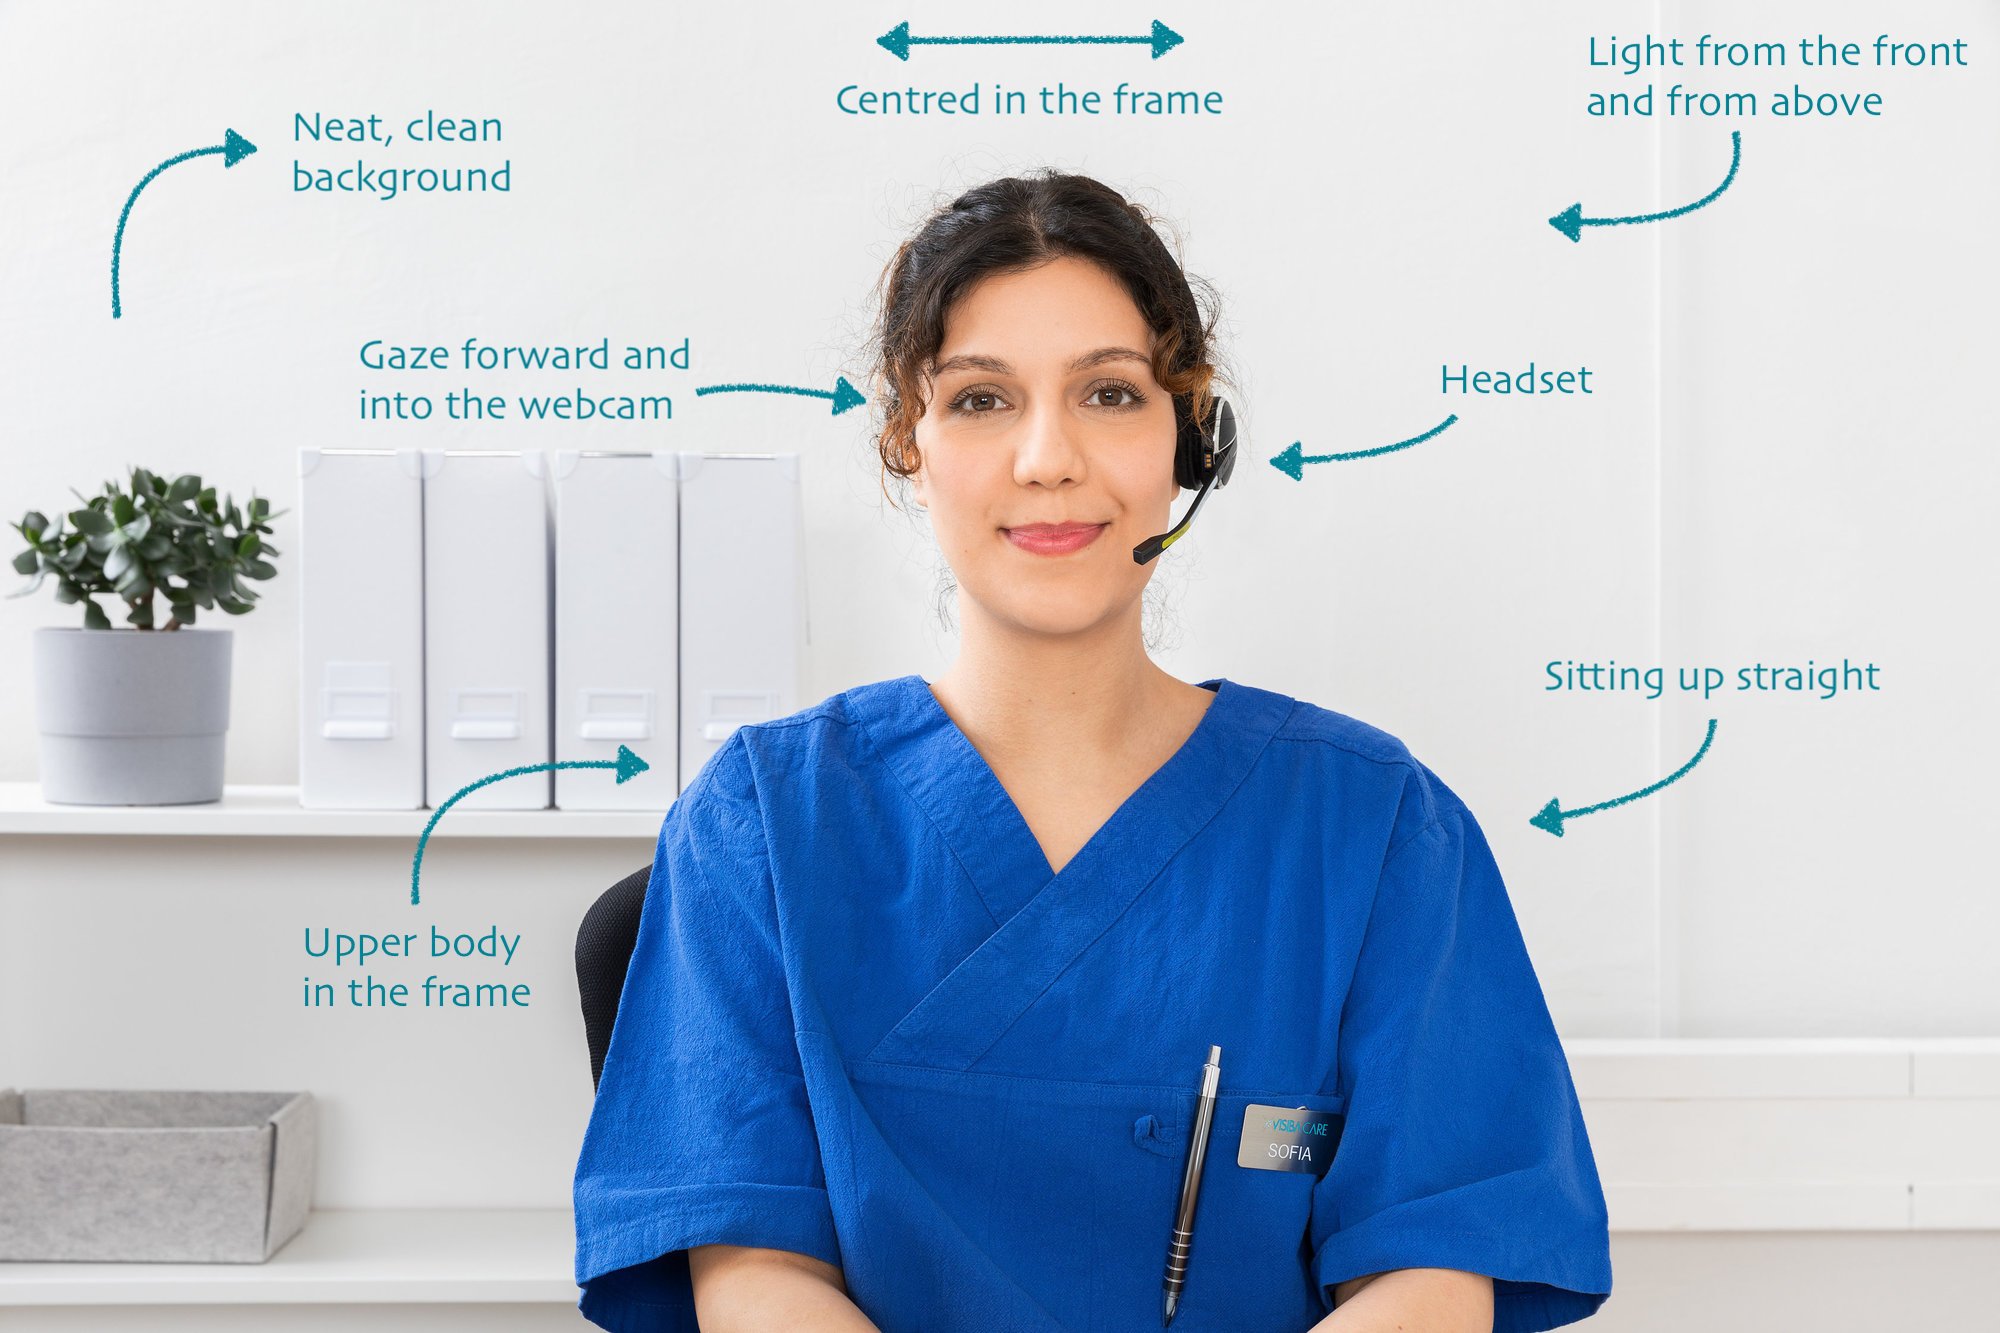
Make or break: Check your lighting
The first lighting rule is to avoid any kind of light behind you as it creates a strong glare and your image may fade – so avoid having a window or a lamp behind you that creates this result:
Set up your light as evenly distributed as your setting allows you to and preferably, have it above you or in front of you and diagonally.
Pro tip: Try to be in a room with as many light sources as possible: natural (sunlight) and artificial (lamps). If you are relying solely on artificial light, choose a white, led light and a distributive lamp.
(Un)stage your background
Repeat the mantra ‘the patient is in focus’ and resist the temptation to create a unique loud background for your image. You want the patient to focus on you and your advice, not on your books or art. It’s useful to keep in mind that your background may take a larger part of your image than you may expect– particularly when the patient is joining the consultation from their computer. If you cannot tell what is displayed in the image, ask someone close to you to take your place in your workstation, have a mock video consultation, and spot with the patient’s eyes what may be distracting:

Pro tip: If you have a plain white wall in your environment – and provided that the light there is not behind you or on the side – set your workstation there.
Be mindful of your posture
You may have to fight some natural instincts there, since engagement makes you want to move closer to your patient, e.g. your webcam. This may create the fisheye effect, where you have moved so close to the camera that you look distorted:

Leaning towards the camera creates a fisheye effect
Don’t be afraid to take a step back from the camera so that your shoulders appear in the portrait. Sit up straight and try to centre yourself in the frame. Once you get comfortable with the posture above, try lowering your chin while keeping your back straight. This will make your facial expressions more articulate in a video consultation.
Pro tip: If you are working on a desktop computer, try moving the screen and webcam a bit further away and placing the mouse and keyboard closer to you, so that you are not hindered from interacting with your computer. If you’re working on a laptop, placing a couple of books under your computer can help bring the webcam at your eye level.
Webcam-contact is eye-contact
Eye contact is one of the most critical factors in conversations and in a video consultation, that means looking straight into your webcam frequently. Research has shown that shifting your gaze at a vertical axis for more than approximately 7 degrees is perceived as looking away; however, gazing a bit higher or lower at a horizontal axis has a larger margin. So looking at the centre of your screen is still perceived as maintaining eye contact with the patient. Nevertheless looking too far away from the general webcam area the whole time will result in this view for the patient:

As it is with a physical conversation, the person who has the floor is usually the one who keeps the pace of the eye contact. This means that when your patient is talking to you, you can alter between looking at your screen and looking at the webcam to maintain rapport; whenever you are addressing the patient, try to look into your webcam.
Pro tip: A small object, like a sticker, placed close to your webcam –that is not visible in your frame– may help drawing your attention to the camera until it becomes a habit.
Your screen is your second background
Screen sharing is a common function in video consultations – and often an overlooked one in video call tips and guides. When sharing your screen, keep in mind the following: Use a neutral background and make sure that no confidential information and files lying around your desktop or browser are displayed. Keep your image neat and free of distractions –remove the bookmark bar (Ctrl/Cmnd+Shift+B) and all other tabs that are not relevant to the consultation. Finally, deactivate push notifications that may pop up unexpectedly during the call.
Prepare a structure/agenda
Depending on the nature of your speciality, setting up an agenda or a structure for your video consultations can help you and the patient maintain an appropriate duration for the appointment. Start with some staples such as greeting, a technical check on their part (can you see me/hear me alright?), introduction, ask your patient about their concern and condition, follow-up questions, next steps, and wrap up (more on that later!). Don’t forget that this helps your patient feel confident in the video consultation too.
Pro tip: After a while, parts of this structure may become almost scripted – to the extent possible – which will do wonders for your confidence. Additionally, an agenda can better prepare you for testing and getting comfortable with the technical flow of the video consultation e.g. being prepared to share your screen and receive files, as you minimise the unknowns.
Articulate and enunciate
Train yourself to speak at a slower pace, at your lowest comfortable pitch and to enunciate each sound clearly. This may mean accentuating the movement of your mouth – and remember, if it feels like you are overcorrecting in real life, on camera it will come across as perfectly natural and helpful for your patient.
Pro tip: If it helps, visualise the written punctuation of what you are saying and steer your speech to reflect that.
Be proactive with technical difficulties
Technical difficulties may occur even in the best of circumstances. If you experience any technical difficulties, have some alternative channels handy for each case; e.g. is your sound not working? Use the chat function most video platforms have to let the patient know to direct them to a different channel. Does the patient have technical difficulties? Have some solutions ready for the most frequent issues, e.g. maybe the patient is muted and doesn’t know it or has the back camera activated instead of the front. If troubleshooting takes more than 2 minutes, don’t hesitate to take the consultation to a different channel, such as the phone.
Pro tip: If you are having a bad technical day and have experienced technical difficulties in previous consultations, let the patient know at the start of the consultation, so that they can be prepared.
Wrap it up nicely
When your video consultation is coming to an end, make sure that you prepare your patient and that you let him/her know that the call will be terminated directly. What you are trying to avoid with this is cutting the patient or yourself mid-sentence –or mid-farewelling– when terminating the consultation. To eliminate the feeling of an abrupt end, after saying goodbye, slide out of the conversation and terminate the call with a smile and a wave.

Pro tip: You may use a standard script for wrapping up that follows the points below:
‘Do you have any questions for me?’
‘I will end the call now’
‘Thank you’
‘Goodbye’
Remember to be attentive to the patient’s responses in these sentences and feel free to terminate the call a couple of seconds after the patient’s goodbye.
Document – but inform
Consulting and updating the patient’s medical record is an important part of each patient case. However, in a video consultation, taking notes and taking care of administration during the call and without notice, may make the patient perceive you as distracted and can create a disconnect in the conversation, as patients see this when they are describing their condition:

You can always take notes during the consultation, but it is critical that you let the patient know so that he/she is prepared for the disrupted eye contact and is aware of what you are doing.
Pro tip: If you have the option, make sure that you set administrative time in the total duration of the appointment. This way, your documentation time is accounted for beforehand and the consultation itself does not take the entire time for each case.
Practice makes perfect
Practising these tips makes the difference between ‘nice-to-have’ and essential. Aim to use all the functions provided in your platform. Practise your first few video consultations with colleagues and give each other feedback. Some questions to ask each other: ‘What went well?’, ‘What didn’t go so well?’, ‘What can I do to improve it?’ and an open-ended question ‘How was your overall experience?’.
Pro tip: It’s critical to keep in mind that most of your patients will join the video consultation via their smartphone; this means that the proportions of your video as well as your screen sharing will look different on a phone screen. Urge your colleagues to join over their phone so that you can extensively test these aspects.
Finally, remember to give yourself time to internalise these steps. As is the case with all new processes, it takes some mental effort in the beginning but it quickly becomes business-as-usual – but until then, we have created this printable checklist to take some of the mental load off! Feel free to print it and place it somewhere visibly at your workstation, so that you can get frequent reminders.
Click here to download your checklist.